1.29.2013

Review and Swatches: Shady Lady Palettes volume 1, 2 and 3 by theBALM ♥

Hey everyone!


Today I just have a quick review and some swatches of the Shady Lady volume 1, 2 and 3 palettes by theBALM. You can get these palettes at Sephora for about $57 CAD each or you can stop at your local Rexall Pharmacy and they’re only around $45 CAD each.


Overall these are great palettes to have. The packaging is super cute and sturdy. Each palette comes with a huge mirror that’s large enough for your entire face however compact and light enough to carry around. The lid is magnetic so it definitely won’t open if you put it in your purse or if you accidentally drop it. Each palette had a combination of shadow/liners and just normal shadows for a total of 9 different colours.

Although the jewel-toned colours in each palette may seem random the shades actually play well together. All the colours are shimmery and throughout using them I experienced very minimal fall out. As far as the quality goes there’s no skimping at all. The palettes don’t contain any parabens, sulfates, synthetic fragrances, synthetic dyes or phthalates and can be used wet or dry.


SWATCHES:

Volume One:

This palette comes with 19.4g of product.

Shady Lady Palette by theBALM
Volume 1
Shady Lady Palette by theBALM
Volume 1


SWATCHES: Shady Lady Palette
by theBALM Volume 1

Volume 2:

This palette comes with 17g of product.

Shady Lady Palette by theBALM
Volume 2
Shady Lady Palette by theBALM
Volume 2


SWATCHES: Shady Lady Palette
by theBALM Volume 2

Volume 3:

This palette comes with 14.4g of product.

Shady Lady Palette by theBALM
Volume 3
Shady Lady Palette by theBALM
Volume 3


SWATCHES: Shady Lady Palette
by theBALM Volume 3

If I had to choose one palette I would go with volume 1. In my opinion the shades complement each other more and you get the maximum amount of different looks with it in comparison to the other two. The cute cheetah packaging doesn’t hurt either. Overall the Shady Lady palettes by theBALM are great to have and I definitely recommend them.

stay fabulous!!
xoxo
naheeda 

1.24.2013

Review and Swatches: Veil Mineral Primer with SPF 15 from Hourglass ♥

Hey Everyone!!


Primer primer primer! Something that can take a great foundation to an excellent foundation. Today I’m going to be reviewing the Veil Mineral Primer with SPF 15 from Hourglass. Before I continue I have to mention the one and only major deal-breaker: this stuff costs just under $60 (I purchased my  for $58.76 CAD at Sephora). So if you’re not looking to pay that much for JUST a primer this review is probably not for you.

Packaging:
  • Super luxurious packaging as always from Hourglass products
    • Glass bottle, with a pump
  • Can tell by the packaging the product is good quality


Here’s what I like about the Veil Mineral Primer with SPF 15 from Hourglass:
  • The consistency!
    • Feels like you’re rubbing velvet into your face
  • Super light-weight
    • Soaks in completely in just one minute
  • Can easily be applied to your face
    • I just dot it onto my face and buff it in with my hands
  • Leaves your face completely smooth for foundation
    • It fills in lines and even decreases the look of pores!
  • Face looks clearer and healthy
  • Only need half a pump for your entire face so it will last you about 5-6 months
  • Amazing sun protective qualities
    • Has zinc-oxide
      • Protect the skin from irritants and soothes minor skin irritations
    • Has titanium-dioxide
      • Reflects light away from the skin to prevents the absorption of ultraviolet rays
    • Has SPF 15
  • It's 100% free of parabens, sulphates, synthetic fragrances, dynthetic dyes and phthalates
  • It’s also 100% oil, fragrance and gluten free


Here’s what I don’t like about the Veil Mineral Primer with SPF 15 from Hourglass:
  • Need to shake it
    • Tends to separate a TINY bit, I suggest lightly shaking it before you use it
  • The price… $60 is just too much for a primer

 SWATCHES:

Just Applied

Blended a Little 

Blended Even More

Completely Blended

Overall I love this primer. If you have $60 waiting to be splurged I would defs recommend doing it on the Veil Mineral Primer with SPF 15 from Hourglass, you wont be disappointed

Stay Fabulous!!
xoxo
naheeda ♥

1.21.2013

Nails Of The Day: "Collide" by Illamasqua ♥

Hey Everyone!

"Collide" by Illamasqua
(the colour is more neon in real life)
Two Coats of "Collide" by Illamasqua
and Sephora by OPI Top Coat
(the colour is more neon in real life)

Because of all the gloomy and dull weather we’ve been having lately in Toronto I decided to change it up today by wearing “Collide” by Illamasqua. “Collide” is a bright and beautiful neon pink colour that will definitely bring in the compliments. This was my very first Illamasqua nailpolish and I believe it was around $15 CAD at Sephora.

The formula of this polish is out of this world. The nailpolish just glides on and smoothens itself out. At first, I thought it was bit runny but I realized the runniness of the polish is what left it completely even when it dried. One layer of this stuff and you’ll have a 95% opaque coat. The second coat is just so the final look is fully perfect and salon-eqsque. In my experience only REALLY “high-end” brands like Chanel or YSL have an outstanding formula like this. For just $15ish compared to $30+ for a single bottle I would say it’s entirely worth it.

After trying this nailpolish I was totally sold on Illamasqua!! I definitely hope you try “Collide” or any other colours from this amazing brand.


"Collide" by Illamasqua
(the colour is more neon in real life)
"Collide" by Illamasqua
(the colour is more neon in real life)


Stay Fabulous!!
xoxo
naheeda 


1.20.2013

Review and Demo: imPRESS Press-on Manicure by Broadway ♥

Hey Everyone!!

imPress Nails

Today I’m just going to be showing you how to apply the imPRESS Press-on Manicure by Broadway as well as giving you my thoughts on them. I picked up my imPRESS nails at WalMart for $9.99CAD per set. 

Here are the three designs I ended up getting:


Dancing Queen
Lovestruck
Vamp It Up

Packaging:
  • Really nice packaging.
  • Come in a cute see-through plastic container that looks like a nailpolish bottle.
  • The lid screws off and the actual container opens in half.
  • Comes with 24 different nails which is A LOT more nails than you would need.
    • This ensures that you will most probably find a proper fit for each nail.
  • The pack also comes with a mini nail-file and a "prep pad".
  • I did notice that a lot of the top edges of the nails were ragged and needed to be filed down. 
    • The mini nail-file that was included was perfect for this purpose.

How to apply:

  •  Find the correct fitting nail for each finger.


  • Lay out 10 nails in finger order.

  • Remove all nailpolish and cleanse each natural nail with prep pad. 
    • I'm pretty sure the prep pad is just rubbing alcohol.

  • Apply the imPRESS nails.
    • Start from the pinky and work your way to the thumb.
    • Apply each nail one by one making sure to also apply pressure for about one minute.


Application:
  • Overall the nails were super easy to apply.
  • It took less than 20 minutes to completely finish doing my nails.
  • The nails feel comfortable because they aren’t too long.


Time imPRESS nails
were applied

January 15, 2013
  • I finished applying these imPRESS nails at exactly 5:02PM.
  • I went shopping.
  • After shopping I went to a movie at around 7:30PM.
  • Once the movie was over I drove home and did a little homework.
  • Then I went to bed.
  • My nails were still going strong.

January 16, 2013
  • The next day I got ready and went to school.
  • Around 12:45PM I noticed my nails were starting to lift a little.
imPRESS Nail Lifting 
  • Once I got home from school I took a shower.
  • I watched a little TV and did some homework.
  • At 8:50 PM I noticed that one of the imPRESS nails were missing! 
    • I just decided to take the rest of them off and paint my nails.

Overall I’m very dissatisfied with the imPRESS Press-on Manicure by Broadway! They’re supposed to last up to a week but they lasted less than 16 hours for me. It would have been understandable if I was doing active things but I wasn’t. Throughout the day I also made sure not to put any unnecessary stress on the nails so there’s really no excuse for them to fall off so fast. If I hadn’t thrown out the receipt I would have returned the other two packages I purchased and i RARELY return stuff (not that there's anything wrong with returning things :P). I do not recommend these nails at all!

Stay Fab!!
xoxo
naheeda 


1.17.2013

Review: Drying Drops by Nicole by OPI ♥


Hey everyone!!


Today I’m going to be reviewing a miracle product I’ve been loving ever since I bought it, the Nicole by OPI Drying Drops. I used to hate doing my nails at home because I’m just too impatient to wait 30 minutes to an hour for them to dry. About a year ago I was strolling through Shoppers Drug Mart’s nail polish section when I saw this product. I picked it up on a whim AND IM SOOOOO HAPPY I DID. At Shoppers Drugmart 
the Nicole by OPI Drying Drops retail for about $10.99 CAD but I’m certain you can find it for cheaper at department stores.

So here’s how it works: you paint a base coat on, then your nail polish, followed by your top coat and lastly the drying drops.

What I Liked About the Nicole by OPI Drying Drops:
  • These drops claim to have your nails dry to the touch within 1 minute and completely dry in 5 minutes.
    • I kid you not after squeezing 1-3 drops of this stuff onto your nails once you’ve painted them they will usually be COMPLETELY dry within 5 minutes.
  • The product itself comes in a clear bottle with a dropper lid.
    • I love the fact that you can see exactly how much product is left and the dropper lid makes it super easy to control how much you're using.
  • Has an oily texture.
    • As well as drying my nails it also kinda moisturizes around your nail bed.
    • This is a HUGE plus for me because nailpolish remover always makes my cuticles really dry.
  • Just like the Drip Dry Drops from OPI
    • It’s a cheaper alternative to the Drip Dry Drops and they’re made by the same company.
    • I can’t even tell one difference between the two products
  • These drops have eliminated all the blowing and the waving and I never have to repaint them because of accidentally smudging them anymore.
  • Double it up with a quick-dry top coat like Seche Vite (<- click for review) and it dries EVEN faster!

What I Didn’t Like About the Nicole by OPI Drying Drops:
  • You have to be careful not to get the oil on anything.
    • ***I have never had a problem with it staining anything though!! Never hurts to be careful I guess. 


Front of Package
Back of Package


Overall i love the Nicole by OPI Drying Drops. I honestly don’t know why I didn’t find them earlier. I HIGHLY HIGHLY HIGHLY recommend them.

Stay Fabulous!!
xoxo
naheeda ♥


1.13.2013

Do It Yourself: Studded Phone Case ♥

Hey everyone,

Studded iPhone case


So I don’t know if you guys have noticed but lately studs have been EVERYWHERE and frankly I love them! I’ve seen them on everything from bracelets to scarves to shorts to tops to jackets to leggings to hats to boots to shoes to bags to sunglasses and literally anything else you can think of. If you haven’t already joined this fabulous and edgy trend I have the perfect DIY for you today, a studded phone case. This awesome project gives you a way to take a plain phone case to the next level without spending too much.


Phone Case and Gold Studs
from eBay

So here’s what you’ll need:

  • A phone case (preferably silicon)
  • 1 cm by 1cm studs 
  • Super glue (optional) 

I bought the plain silicon phone case and the pyramid shaped studs on eBay. The case was only $1.23CAD (including shipping) and the studs were $1.75CAD (including shipping). 


1. Get an idea of the pattern you want
  • sketch out or loosely place the studs in the shape you want. 
Outline


2. Secure the studs


  • I started from the bottom of the design and worked my way up.
  • Because I was using a silicone case I had to press the studs into the case and fold over the prongs one by one.
    • If you don’t like the way a stud looks when you fold over the prongs simply unfold the prongs and reattach the stud.


  • If you are using a hard phone case fold over the prongs first and then take the superglue and glue them on one by one.
    • Be very careful of where you are placing the studs because superglue is permanent. Even if you can remove the stud there will be glue residue remaining on the phone case.


3. Complete the design
  • Continue to attach the studs until your design is complete!


4. If you are using a silicon case make sure to cut a piece of paper to put inside the phone case before slipping your phone it.
  • This will prevent the prongs from scratching the back of your phone. Because I put a back cover on my phone I didn't have do this last step.

(the back of my phone has a back cover, that's why there are random bubbles lol)

And there you have a super cute and fashion friendly phone case. I hope you guys try this easy and inexpensive DIY!

As always Stay Fabulous!!
xoxo
naheeda


1.11.2013

10 Beauty Resolutions for the New Year ♥


Hey everyone!

Bye Bye [Bye *insert N’Sync flashback* lol] 2012 and HELLO 2013! I hope everyone’s having a great New Year so far because I sure am :). 
Today I’m going to be sharing my ten New Year’s BEAUTY Resolutions. I hope my easy and achievable list inspires all you gorgeous girls out there to also pay yourself some extra TLC.

So without further-ado here here we go:

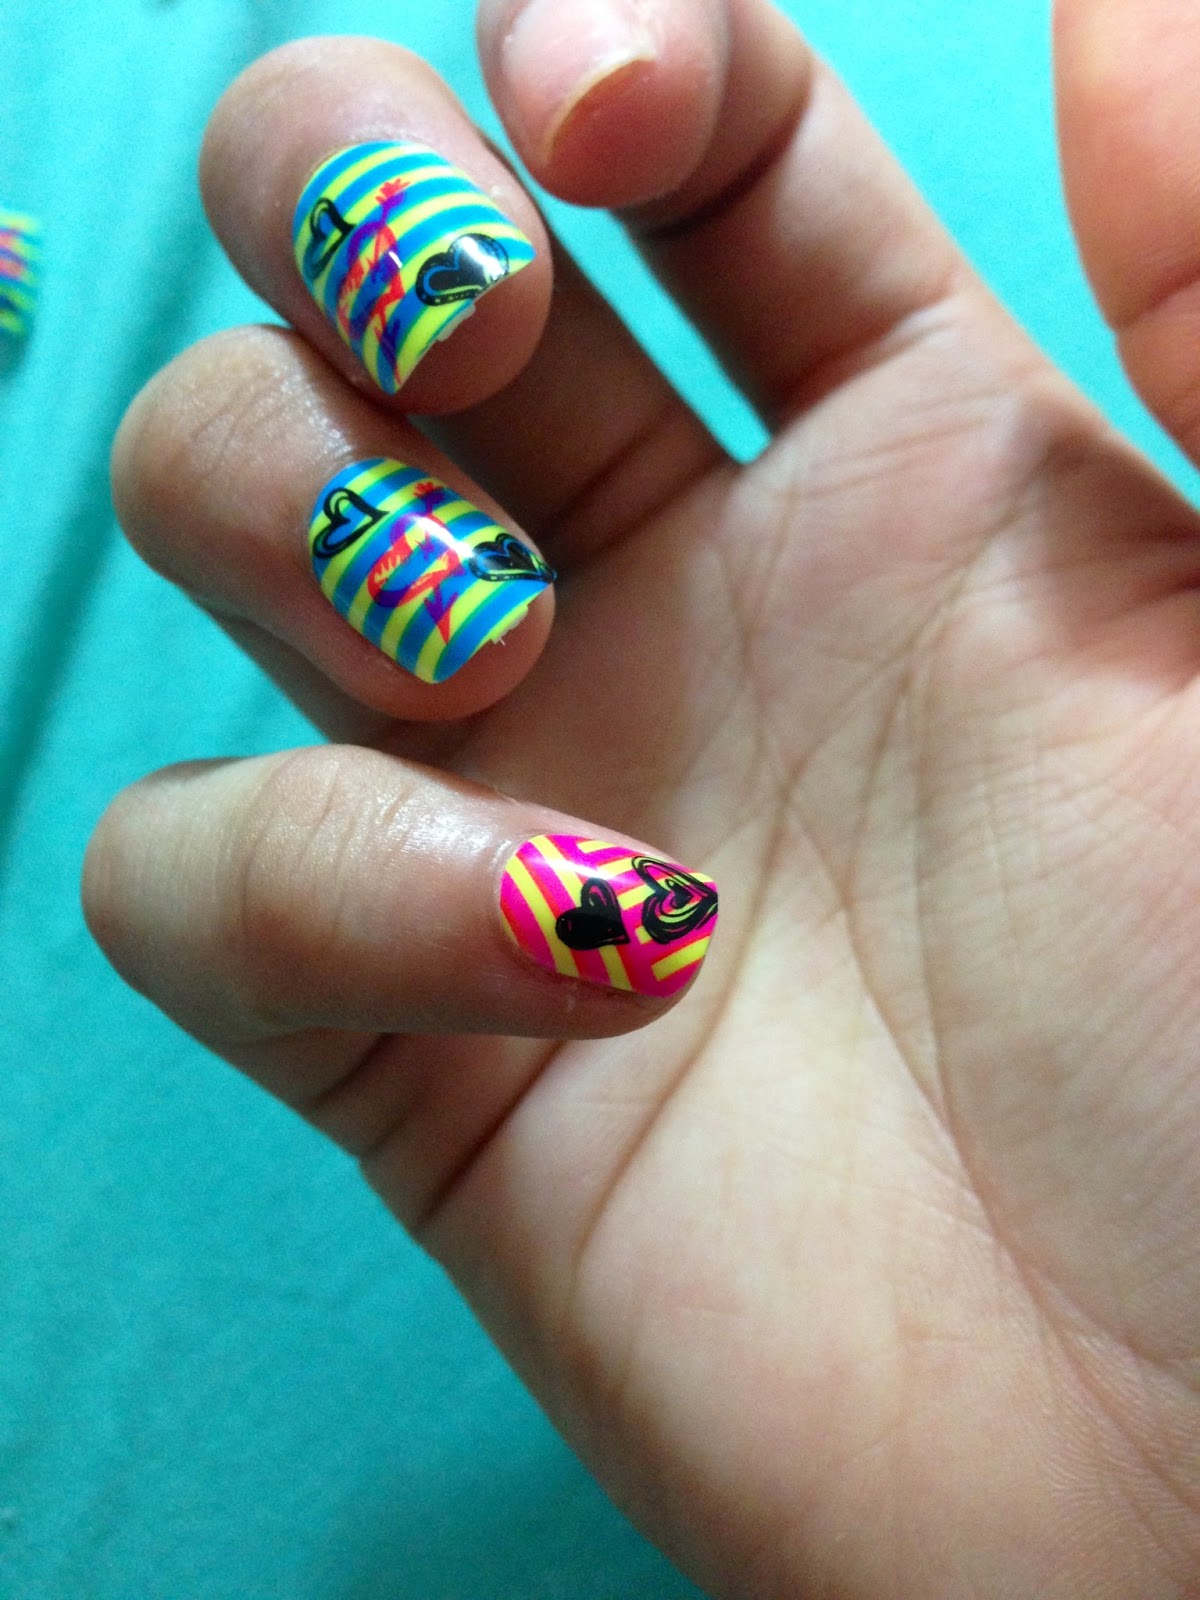
Number 10: STOP BITTING MY NAILS
This is something that pretty much more than half the world needs to work on. Nail biting is one of those annoying habits that happen without you even knowing. Did you know that you could get worms from biting your nails! I know GROSS!

Until I kick this bad habit to the curb I’m going to paint my nails bright colours every week. This way I can constantly remind myself not to nibble away at them.

Number 9: BUY LESS BEAUTY PRODUCTS
I swear I tell myself this every time I leave a mall LOL. To stop myself from giving in the next time I enter a Sephora I’m going to go through all my makeup. Going through all your makeup at least once a year helps you know what you have to use before going out and get anything new. *fingers crossed*

Number 8: SPF SPF SPF!
SPF is soo important in the summer and even in the winter. I can’t stress how delicate our skin is against sun rays. SPF protects us from skin cancer, sunburn, wrinkling and premature aging. Sure you may have a better tan now but you’re going to end up looking 10 years older than you are pretty soon.

This year I plan on SPF’ing it up by only purchasing moisturizers with SPF. [I swear I said “SPF” like 100 times in a matter of those last few sentences lol]

Number 7: COMPLETE A BEAUTY DARE
What’s a beauty dare you may ask? A beauty dare is when you step outside of your comfort zone and wear something you normally wouldn’t. For example bold lips or a funky pattern. Personally I NEVER switch it up, so this is actually going to be a challenge for me.
*remember not to go too far, always wear what you’re comfortable with

Number 6: CLEAN MY MAKEUP BRUSHES MORE OFTEN
I have never been bad with this but there’s always room for improvement. Dirty brushes and other products can harbour dirt and bacteria you don’t want to be putting on your face. This will prevent breakouts and it’ll be easier to apply product with nice and clean brushes. You can also clean eyeliners and lipliners by simply sharpening them.

Number 5: BRUSH MY HAIR
This may sound crazy but brushing my hair is really something I have to work on. I have curly hair, so brushing it is actually kinda hard work. It takes time and it always leaves it frizzy and semi-afro-ish.

This year I’m definitely going to brush it out every day and apply a little bit of Moroccan Oil. Applying a tiny bit of the Moroccan Oil will eliminate the frizz and hopefully rejuvenate my hair without leaving it greasy and chemical filled.  

Number 4: WASH OFF MY MAKEUP
This is a big one for me. Some nights I come home already half asleep and jump right into bed.

This year I’m going to make sure to wash my makeup off every night to keep my face clean and let my skin breath. 

Number 3: KEEP ONTOP OF MY SKINCARE GAME
Skin-care is super important for everyone! This year I’m absolutely-positively going to follow a proper skin care routine. Every day when I wake up and before going to bed I’m going to make sure to:
  • Cleanse
  • Tone
  • Moisturize
  • Exfoliate 1-2 times a week


Remember healthy skin is happy skin.

Number 2: GET MY BEAUTY SLEEP
When you sleep your body does a lot more than just rest. The hours you spend dozing are when your skin works to regenerate and repair your skin cells. Lack of sleep can speed up the aging process and increase the rate of health issues.

This year I’m going to try to get 6-8 hours of rest every day. 

Number 1: EAT HEALTHIER FOOD
This is my biggest vice. I LOVE JUNKFOOD… but unfortunately my body doesn’t.

This year I’m going to try my hardest to keep track of my calorie intake and not eat fast food often. It may be hard to say no to Ronald McDonald’s tempting ways but with a little determination and persistence it’ll be a piece of cake [yes pun intended LOL]


Hope you guys have a wonderful year and never forget to Stay Fabulous!
xoxo
naheedz