6.06.2012

Review, Swatches and Dupe: “Turkish Delight” by NARS ♥

 Hey Everyone!

Today I want to talk about my favourite lip gloss in thewhole world, which is “Turkish Delight” by NARS. I pretty much wear this glossevery single day and honestly it’s a gorgeous. It retails for about $33CAD for 0.28oz at Sephora stores and to me is worth every penny.

One of the reasons I love “Turkish Delight” by NARS so muchis because it’s super wearable. It can be worn on its own and it will leave anice baby pink affect to your lips or it can be worn on top of lipsticks togive that extra bit of shine. The colour itself is a beautiful milky-pinkcolour that’s has little to no shimmer in it. It slides on your lips like oiland the longevity is amazing. It is just the tiniest bit sticky like all NARSlip glosses but it’s not that noticeable. 

"Turkish Delight" on lips
The only bad thing about this gloss is the smell. Honestly whatis up with NARS lip glosses having that awful plastic odour…?
NARS’ “Turkish Delight” lip gloss instantly gives you thatbig, plump and juicy look and I really recommend it. “Turkish Delight” is NARS’bestselling lip gloss shade and it’s sported often by many celebritiesincluding Kim Kardashian. People are always looking for a great nude gloss andanytime someone asks me what I recommend this is the first gloss that comes tomy mind. If you don’t already own the NARS lip gloss in “Turkish Delight” goout and get it right now!

---
A great dupe for
“TurkishDelight” by NARS is a Lip Lite by Bonne Bell in “Strawberry Parfait”. Thecolour on your lips is pretty much identical and it’s a whole lot cheaper. The smelland taste of the “Strawberry Parfait” Lip Lite by Bonne Bell is MUCH betterthan “Turkish Delight” but unfortunately it doesn’t last as long.

Bonne Bell Lip Lite in "Strawberry Parfait"
NARS "Turkish Delight"


Stay Fabulous! 
xoxo 
naheeda ♥

6.01.2012

Review: “Photo Finish Hydrating Foundation Primer” by Smashbox ♥

Hey everyone!


"Photo Finish Hydrating Foundation Primer" by Smashbox

Today I’m going to be talking about the Smashbox “Photo Finish Hydrating Foundation Primer”. This is my current go-to foundation primer and I absolutely love this product. It is around $56CAD for 30mL of product at Sephora stores.

The Photo Finish Hydrating Foundation Primer not only primes your makeup but I also find that it minimizes my pores and reduces the look of the small fine lines I have. Over the course of using this primer it’s really noticeable that my face has become smoother and softer. I was never been a fan of foundation primers because I didn’t use a single one that made a significant difference until I started using this one. My foundation looks much more flawless and super natural with the Photo Finish Hydrating Foundation Primer.

you only need a pea size
for your whole face
When I first saw this I was kind of scared because of the blue colour but I bought it on impulse and I am super happy I did. The texture of the Photo Finish Hydrating Foundation Primer is very similar to a moisturizer. The consistency is like a gel but when it’s applied to the face its very light. It soaks in fast and I haven’t had a single breakout from using this product. A little definitely goes a long way with this product. You need only a small squirt of it for your entire face.

Now that the weather is really starting to heat up for those of you who who have trouble haiving your makeup last all day The Photo Finish Hydrating Foundation Primer can truly make a difference for you!

stay fab!!
xoxo
naheeda♥


5.31.2012

Review and Swatches: “Touche Éclat Radiant Touch” by Yves Saint Laurent ♥

Hey everyone!

As the 20 year anniversary rolls around, today I figured I would talk about the ever so famous “Touche Éclat Radiant Touch” by Yves Saint Laurent. The Touche Éclat Radiant Touch is a complexion highlighter that *is supposed* to help conceal the signs of fatigue, sculpt and highlight your face, refresh your eyes and enhance your smile.

First let’s start off with the packaging. With a whopping price of around $57 CAD at Sephora stores for only 2.5mL of product, it’s no surprised that it looks very posh and luxurious. It is a golden metal pen like product that comes with a lid. It has the classic “YSL” logo carved into the top of the lid and has minimal delicate black writing on it. The back of the pen had a black button that you can push for product to come outside from the brush tip applicator. The fact that the product is in a pen like container with a brush tip applicator makes it super convenient and travel friendly.

YSL logo

writing on the pen
The Touche Éclat Radiant Touch by Yves Saint Laurent comes in a large variety of colours. Unlike many popular products the Touche Éclat actually has shades for women of darker skin tones. I`m in the shade number “5” and it’s actually the perfect match for my face.

I use the brush tip to place the product on my face where I need it and use my fingers or another brush to smooth it in.

Like I mentioned before the Touche Éclat pen has four main uses (help conceal the signs of fatigue, sculpt and highlight your face, refresh your eyes and enhance your smile). Personally I don’t feel like it does any of the things it’s supposed to do outstandingly. It’s really nothing special. I really only think it’s good for concealing under your eyes because it does not look cakey and it has an easy bendable consistency. There are so many products that are out there that are so much cheaper than can do so much more for your face that the Touche Éclat. I don’t hate using this but once it is over I definitely will not repurchase it and I do not recommend it.

SWATCHES:

no product

product applied onto arm

product blended out on arm


stay fabulous!
xoxo
naheeda♥

5.30.2012

Do It Yourself: Nailpolish Rack ♥

Hey everyone!


Today I’m going to be showing you guys how to make your very own nail polish holder! I made this project about a month ago and it’s still going strong so this is something ng you can definitely DIY and be happy with. I used to buy acrylic shelves from eBay to display my nailpolishes but as my collection grew it finally hit me that the $30-$60 I’m spending on the shelves could be used for so many other purposes…like buying more nailpolish :P

So here’s what you will need:
  • 3 Foam boards
  • Tape measure
  • Ruler
  • Pencil
  • Eraser
  • Glue gun
  • Glue gun sticks
  • Knife
  • Scissors

Starting from the bottom, divide a foam board into rows of 10 cm’s from top to bottom.
I ended up with 7 lines and one row that was only 6cm. The 6m row will be used as the top shelf.

*Using a tape measure may be easier for you than a ruler to measure larger things.

10cm divisions

Take another foam board and make rows that are 5cm’s from top to bottom. These will be the shelves so make as many as you need depending on how long your foam board is, I needed eight.

5cm divisions

Take a knife and score the lines you drew on the foam board with the shelves on it (be careful not to scratch your floors) -this will make it easier to cut with scissors-. Bend the scored lines and take your scissors and cut the strips.

carved lines with a knife

bend carved lines

cut the bent lines with scissors


Take a third foam board and draw two columns that are horizontally 5cm’s and vertically the measurement of the foam board (mine was 76cm). This will be used for the sides of the nailpolish rack.

two pieces for the sides of the rack


Heat up your glue gun.


*now you have to work fast*


Take your hot glue gun and squeeze a thick line of glue on the 1st foam board that was divided into 10cm increments. Quickly take one of the 5cm pieces and place it on the hot glue. Hold it securely for about 45 seconds until its stiff. Do this until your foam board has the desired amount of shelves on it. Add glue in the tops and the bottoms where each shelf is placed on the first foam board if you want to further secure it.
place glue on the lines

glue on shelves


Take the two long pieces and glue them onto the sides.


And VOILA you’re done!


**Take you glue gun and put extra glue where you may need it.
**To mount it on a wall use a screwdriver or drill and some screws and just secure it on all four corners.
**DO NOT SPRAY PAINT/ PAINT your rack because it will make the glue pull and it will fall apart (trust me I learned from experience and had to re-do mine).
do not spray paint

foam board becomes wrinkly and
unstable if you paint it


So that’s it.
Everyone needs a home right, including your nailpolish. I hope you guys have fun making this easy “do it yourself” project. If you do make this yourself don’t forget to tweet me your pictures (@naheedzzz). If you have questions or comments also feel free to tweet me J

stay fabulous
xoxo
naheeda ♥


5.15.2012

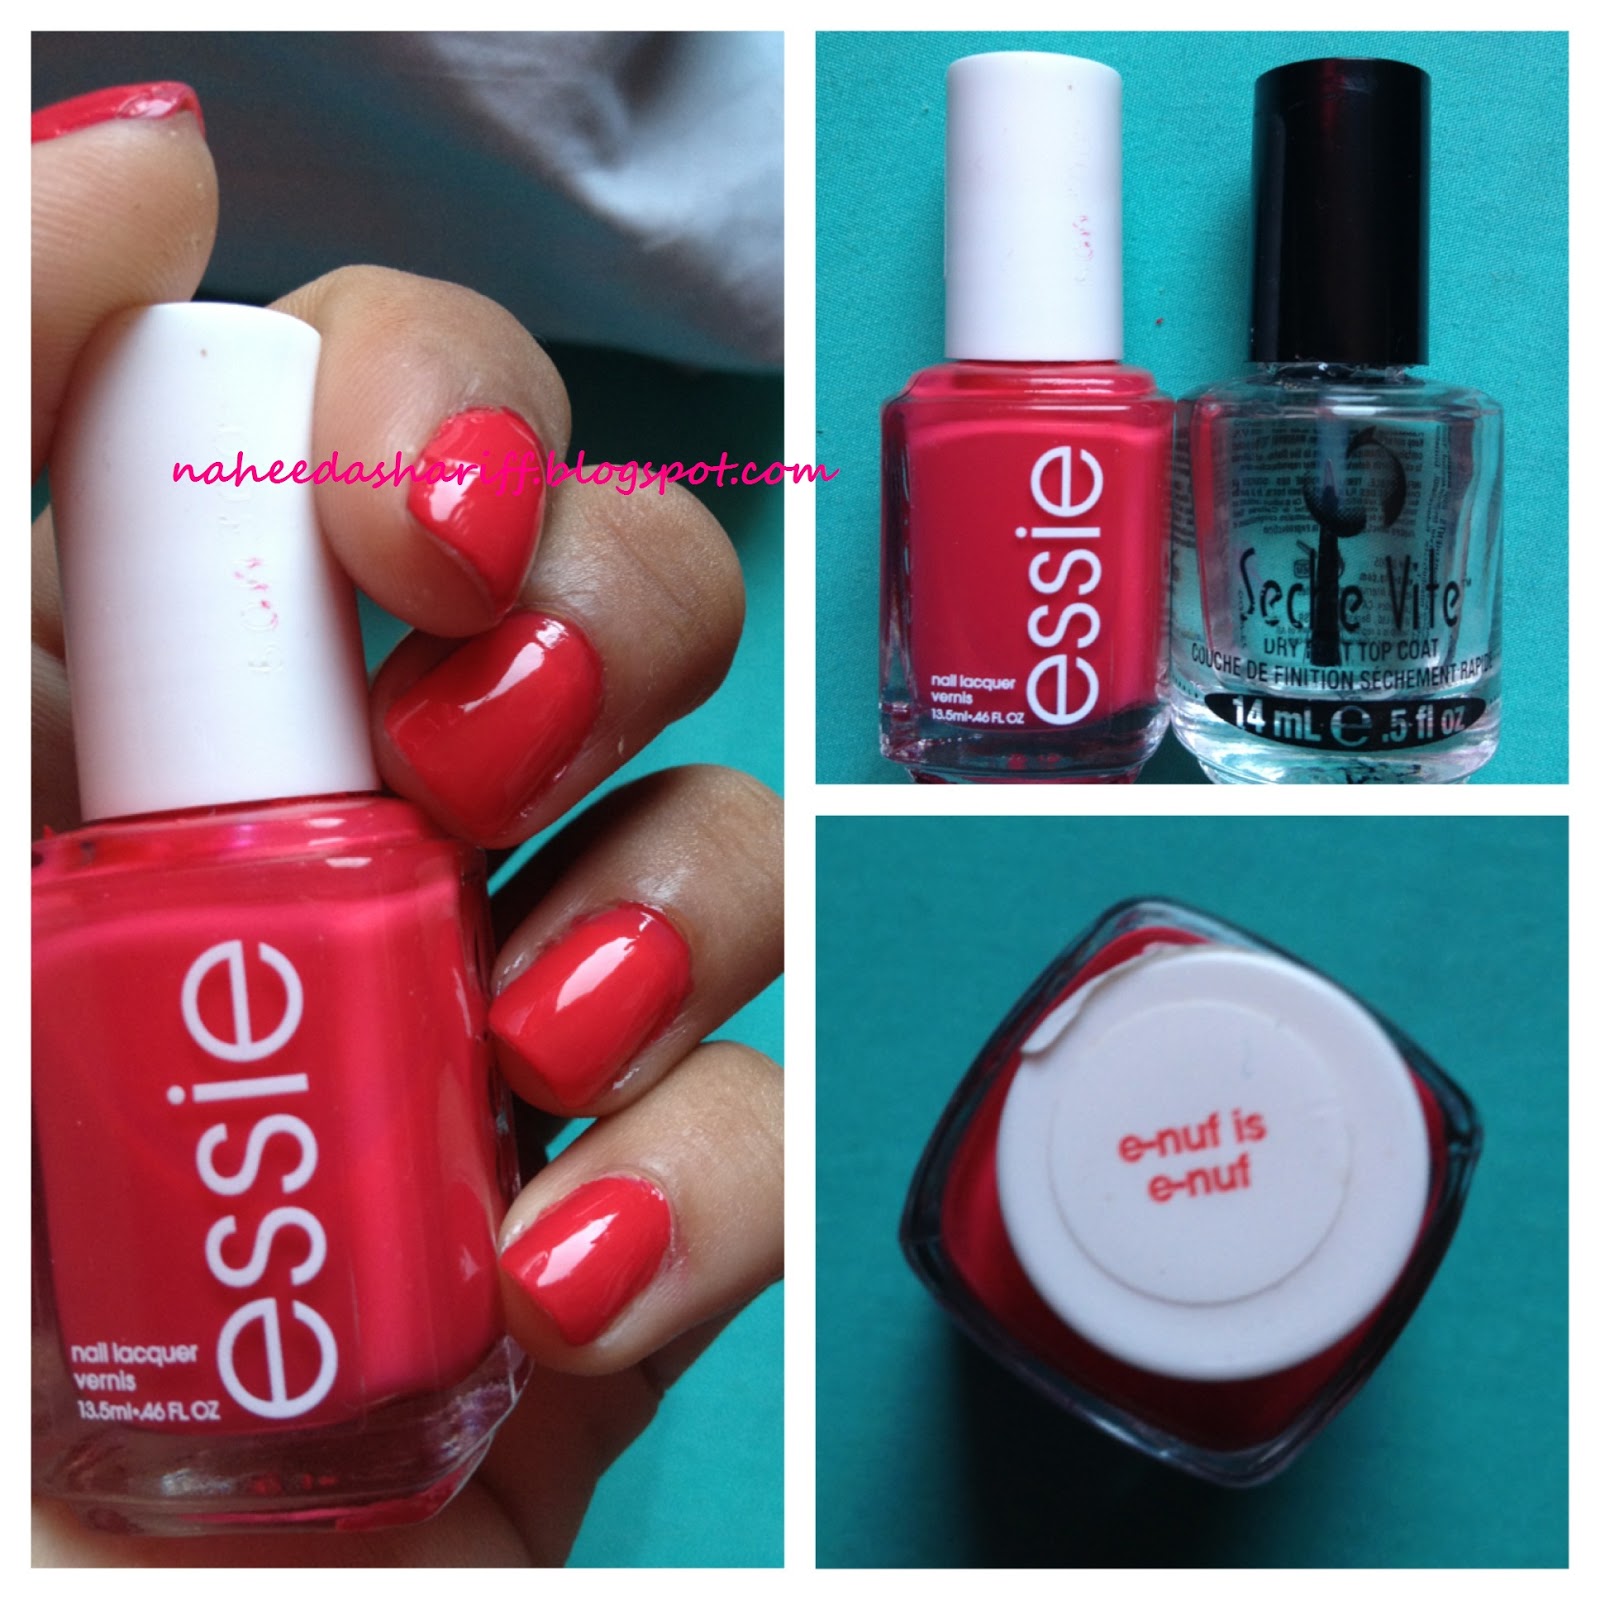
Nails Of The Day: “E-nuf is E-nuf” by Essie ♥


Hey Everyone!!

not showing up completely true to colour

For the last week I have been wearing the colour “E-nuf is E-nuf” by Essie on my nails. It’s a gorgeous coral-red-berry colour that’s absolutely vibrant. You get the best of both worlds because this colour is not too orange nor is it too red. I bought this nailpolish at Shoppers Drugmart for about $12 but this is a really popular colour so you can pretty much find it at all stores that retail Essie nailpolishes.

Essie nailpolishes can sometimes be a hit or miss. There are some polishes which are just great and there are some that have the worst formulas, this particular colour is definitely a hit. It goes on perfectly and dries pretty fast. It looks great when it’s completely dry and the colour when applied is true to the bottle.
Just this past weekend I went to Ottawa to do some sightseeing and I was surprised to notice that my nails looked perfect. I had already been wearing the colour for 3 days and even after my trip there was no chipping or peeling (I did have Seche Vite on).

If you are looking for a bright and outstanding colour I would definitely suggest you buy “E-nuf is E-nuf” by Essie.

stay fabulous!
xoxo
naheeda ♥

5.03.2012

Review: REVLON PhotoReady Airbrush Mousse Makeup foundation ♥


Hey everyone!!


This is a review on a foundation that just quite didn’t make the cut for me. The new REVLON PhotoReady Airbrush Mousse Makeup foundations are “light-as-air” mouse foundations that are supposed to blend seamlessly into your skin. You can find these foundations at many drugstores and at Wal-Mart for about $16 CAD each.


pump
First I’m going to talk about the packaging:

This foundation may seem like a regular bottle but it is actually a metal can. It is 1.4oz of product which is pretty decent and container itself is pretty compact and travel friendly. Although the idea of a foundation coming in an aerosol can is very cool the reality of it is that is sucks. The poor design of the cans make it very hard to control the amount of product that you are actually taking. Even when the pump is pressed lightly you get a huge glob of product on your hand. Another thing I didn’t like about the packaging is that you literally have to shake container for about a minute every time you use it because otherwise separated product will come out.


Here are a few things I did like about the REVLON PhotoReady Airbrush Mousse Makeup foundation:
  • The foundation comes out in actual mouse form (which is very unique)
  • Feels very light on the face
  • Gives a smooth feel to skin once it’s dry
  • The foundation is long lasting
  • Somewhat buildable (starts looking cakey if you do a 3rd layer)


Here are some things that I didn’t like about the REVLON PhotoReady Airbrush Mousse Makeup foundation:
  • Colour wise, there is a very small variety (total of 8 different shades available)
    • I picked up the colour in “070 rich ginger”. This colour is too dark for me but the colour before this too light for me.
  • It’s a gimmick because when you touch the foundation, it defoams to look like a normal liquid foundation (pretty much is a normal liquid foundation)
  • You have to literally shake the hell out of the foundation
  • It has sparkles in it? (Which does give a dewy finish but the sparkles are just super obvious.)
    • Not for people with wrinkles, acne scars, large pores, or any kind of uneven skin. The shimmery particles with enhance your skin irregularities.
    • It heightens the look of dry spots and flakey skin
  • The foundation smells REALLY bad
  • Feels watery
  • Strictly light to medium coverage
  • Have to be very careful with how hard to press
  • A little product comes out even after you stop pressing the pump
  • Doesn’t cover up redness or scaring

how it comes out of the pump

The REVLON PhotoReady Airbrush Mousse Makeup foundation is for people with normal skin type. This foundation is too luminous for people with oily skin and it’s also overemphasises the look of dry skin. I don’t like the look of this foundation applied with my fingers or even with a brush (I feel like the best way to apply this foundation is with a makeup sponge). Personally I wouldn’t repurchase or recommend this foundation.  

Stay Fabulous!
xoxo
naheeda ♥


Perfect Smoky Eye Palette! Review and Swatches: Lancôme Eye Brightening All-In-One -5 Shadow & Liner Palette in “600 Gris Fatale” ♥


Hey everyone!
  
Lancôme Eye Brightening All-In-One 5 Shadow & Liner Palette in "Gris Fatale" 
Today I’m going to do a review on one of the Lancôme Eye Brightening All-In-One - 5 Shadow & Liner Palettes in “600 Gris Fatale”. You can find this palette at of course Sephora stores, sephora.com , and really any other place that sells Lancôme products (The Bay, some Shoppers Drugmarts, etc.). This palette retails for about $60 CAD which is definitely pricier than other palettes but for the quality its 100% worth it.
Colours in the Palette
I really think the “Gris Fatale” palette is the perfect nighttime/ smoky eye palette. You can achieve sultry and prominent eye looks with different combinations of the shades in this product. There is a mixture of different finishes in the “Gris Fatale” palette and something I love about it, is that its super compact. You can just throw it into your bag and once work is over you can do a quick and easy eye appropriate for going out at night. This one product consists of a base, lid, crease, highlighter and a liner colour, which is pretty much everything you need to complete your eye looks (so it literally doesn’t get easier than this). The shadows are also extremely long lasting and I haven’t noticed any fading.

Each individual eyeshadow is very luxurious and is simply beautiful. I find that any look I do with this palette helps brighten and make my eyes stand out. All the eyeshadows are fragrance free and have a very silky texture.

Like all Lancôme products the Eye Brightening All-In-One - 5 Shadow & Liner Palettes come in very sophisticated black packaging. These palettes have the signature silver Lancôme rose on the bottom right corner of the lid. Each palette has 5 eyeshadows for each step of the 5 steps to complete an eye look and two sponge tip applicators. Also included is a very handy illustrated instructional booklet with 2 different 5 step looks you can do for night and day.


SWATCHES:


Personally I would say that this palette is more on the night time side, but to each their own J. My favourite colour in this palette is the eyeliner which is a very pigmented black shade that also has silver glitters in it, giving an overall stunning look. I highly recommend you go into Sephora and take a look at this palette because you will fall in love with it once you see the awesome colours, like I did.


Book:


day look:
steps 1-3

steps 4-5 and finished look


night look:

steps 1-3

steps 4-5 and finished look


Stay Fabulous!
xoxo
naheeda ♥

4.27.2012

Review and Swatches: Sally Hansen Smooth and Perfect Nail Polishes ♥

Hey everyone!


Today I’m going to be talking about the Sally Hansen Smooth and Perfect Nail Polishes. This collection consists of gorgeous light and pastel colours. Although the colours are very elegant and lovely, overall these polishes weren’t a winner for me. But if you are looking for them they are about $8 CAD each at Shoppers Drugmart and you can also find them at other stores like Wal Mart, Zellers, etc. 


What I liked about the Sally Hansen Smooth and Perfect Nail Polishes:
  • Colour wise, this collection is marvelous.
    • The pastel and baby colours make this line perfect for summer.
  • This nailpolish goes on perfectly.
    • As it claims it definitely goes on very smooth.
  • Nice big brush.

And now what I didn’t liked about the Sally Hansen Smooth and Perfect Nail Polishes:
  • The colours aren’t opaque AT ALL
    • You literally need about 5 coats to get a nice opaque layer of colour.
  • The final look is really thick because of the layers of nailpolish.
  • Each coat takes FOREVER to dry.
    • I literally kept my hands still for about an HOUR and TEN MINUTES before I fully finished painting my nails
  • The formula is pretty runny. (Personally I like a medium balance between thick and runny but these nail polishes are exceptionally runny.)
  • Chips easily
    • Have to make sure you apply a top coat!!

I bought four colours, which are “08 Sorbet”, “05 Whisper”, “06 Air” and “07 Sea”.


Here are the SWATCHES (sorry for the messy paint job -I was just getting tired of keeping my hand still for sooo long-):

4 coats of nailpolish


As you can see, there are way more negative aspects to the Sally Hansen Smooth and Perfect Nail Polishes than positive ones. I DON’T recommend these nailpolishes at all. This nail polish line was a huge disappointed because I was really looking forward to wearing these stunning colours through the summer! While they do achieve what they claim (really do give your nails a wonderful and smooth look to them) the formula just straight up SUCKED. 

Stay Fabulous!
xoxo
naheeda ♥


4.26.2012

Review and Swatches: Maybelline New York Eye Studio Quad in “70 Copper Chic” ♥

Hey everyone!


About 2 weeks ago I went into the drugstore to find a great palette that I could make a lot of use of to do quick and wearable looks for the day time. I ended up picking a few things up including a Maybelline New York Eye Studio quad in “70 Copper Chic”. The Maybelline New York Eye Studio quad in “70 Copper Chic” is a gorgeous and inexpensive quad that consists of a pinky-champagne colour, a peachy-copper shade, a true bronze colour and a chocolate brown shade. I bought it for about $14 CAD at Shoppers Drugmart but you can definitely find it for much cheaper at WalMart.

Regarding the colour payoff, it’s about a 7.8/10. When I saw this quad at the store I thought the shadows are going to be wonderful but they just quite didn’t live up to my expectations. Don’t get me wrong, this quad is still amazing quality for drugstore makeup but I just wouldn’t say it’s the best I have come across. One thing you do have to remember is to be careful of how much you pick up because when you tap your brush into the shadows a lot of colour gets picked up.

comes sealed
The packaging is nothing special. The bottom part is made from a black plastic and the top part is a clear plastic lid. The only thing it comes with is a double ended sponge-tip applicator. Something I do like about the packaging is that it comes clearly sealed unlike some drugstore makeup products.

When applying these shadows you have to make sure to tap and pack the eyeshadow onto your lid rather that swiping to avoid fallout. All the colours are shimmery and the texture is very velvety.

SWATCHES:


Because summer is starting to come around this copper toned palette will look especially gorgeous on the eyes against tanned skin under the sun. If you are looking for a good daytime palette I highly recommend this for you :)

Stay Fabulous!
xoxo
naheeda ♥

4.12.2012

Review and Swatches: "Kitten" eyeshadow by Stila ♥

Hey everyone!


Today I’m going to be talking about another cult favourite product. It’s a gorgeous everyday eyeshadow by Stila in the shade “Kitten”. You can find this colour at your local Sephora for about $26 CAD or at http://www.sephora.com/eye-shadow-P8431?skuId=1330281 for $18. Out of all the eyeshadows available "Kitten" by Stilla is actually Sephora’s bestselling eyeshadow.

Firstly I'm going to start off with saying this product is super frosty, so if you don’t like shimmery eyeshadows you probably won’t like this colour. I however, love it! “Kitten” by Stila is an extremely pigmented champagne peach colour that looks great on all skin tones. It’s the perfect everyday colour that can be toned down with a neutral base or even toned up with a white base. This colour is great for brightening up your eyes. It has a slight iridescent gold quality to it that is very flattering on everyone. The best part about this shadow is that because it’s neutral it will match pretty much anything you wear.

Like all Stila products the quality of this shadow is very luxurious. It is definitely much better than MAC eyeshadows because of its smooth and silky application. The only thing I don’t like about this shadow is that it is very crumbly. The softness of this shadow causes it to leave fallout, which can be very irritating. 
**Make sure to apply your foundation and concealer after you use this eyeshadow so you don’t end up looking like a hot mess.

Wet n' Wild
"Walking on Eggshells" palette
Stila “Kitten” can be used as an all over eyelid colour, inner corner colour and as a brow bone colour. Because this shade is very multipurpose you could even us it as a highlighter. Unlike some eyeshadows “Kitten” blends in flawlessly when applied anywhere to the face.

“Kitten” is a very unique shade. I have never come across an exact dupe for the colour but a cheaper alternative would be the “eyelid” colour in the “Walking on Eggshells” palette by Wet n’ Wild.


SWATCHES:


“Kitten” by Stila is a stunning colour and I absolutely recommend it.

Stay Fabulous!
xoxo
naheeda ♥

4.10.2012

Nails Of The Day: GOSH "60 Lambada" ♥

Hey everyone!


Today I'm wearing a beautiful nailpolish colour called “60 Lambada” by Gosh. You can find this nailpolish at most Shoppers Drug Mart locations for about $9 CAD each.  I ABSOLUTELY love this polish colour because it’s a unique bright and vivid red shade that’s will surely draw in attention.


Like all Gosh nailpolishes this colour applies perfectly and is very opaque. The consistency is very creamy and doesn't steak at all. With just about one coat of this nailpolish you will have fairly perfect coverage.  This nailpolish also dries extremely fast. I love Gosh nailpolishes because like “60 Lambada” all the other colours I own are dry to the touch in less than 10 minutes as well.

This is a gorgeous shade and if you’re ever looking for a perfect true red colour I definitely recommend you pick it up.

stay fabulous!

xoxo

naheeda ♥