3.30.2012

Review: Dry Fast Top Coat by Seche Vite ♥

Hey Everyone!

I always loved doing my nails but I hated having to wait 30 minutes to an hour for my nails to be completely dry. Ever since I tried the Seche Vite top coat doing my nails has literally been a breeze. It’s about $10 CAD for a 0.5oz bottle at Sally Beauty Supply stores. Although this top coat may be more expensive than other drugstore top coats its 100% worth it. It leaves my nails smooth and shiny. It prevents dents and the best part about this top coat in comparison to others is that it prevents chipping for sometimes even more than 5 days. I find that I can even apply three coats of a nailpolish and then immediately apply the Seche Vite top coat and my nails will be dry within 10 minutes. The Seche Vite to me is the best top coat out there and I have been hooked since the day I first bought it.

*The only thing I hate about it is that it thickens after you have used abut half the bottle. 

stay fabulous!!
xoxo
naheeda

3.22.2012

Review and Swatches: NYX Jumbo Eyeshadow Pencils ♥


Hey everyone!


This is a review on the NYX Jumbo Eyeshadow Pencils. These are super affordable and versatile eyeshadow pencils which can be used on their own or under any eyeshadows to make them more vibrant. They retail for $5.99 on the NYX website (http://www.nyxcosmetics.ca) but I bought mine off eBay for about $40 for 11 different colours. In Canada you can only mainly find NYX products at Rexall Pharma Plus stores.

What I liked about them:
  • I really like the NYX Jumbo Eyeshadow Pencils for many reasons. The number one reason I love these is because they are really cheap. For the quality of the NYX Jumbo Eyeshadow Pencils the retail price itself is a bargain.
  • These shadow pencils are pretty much the same as MAC Shadesticks ($21 CAD).  I personally prefer them to the MAC Shadesticks because they aren’t as dry. 
  • They are very creamy and easy to work with.
  • I never find myself struggling with the NYX Jumbo Eyeshadow Pencils because they blend effortlessly.
  • Another thing I like about them is that they are available in pretty much every colour. 
  • NYX shadow pencils are also bold and they all give amazing colour payoff.  
  • You can get a lot of use out of these shadow pencils because they can be used on most parts of the body which is great if you do costume makeup.
  • A lot of people like using these as eyeliner and I’ve also seen people rub a little on a clean mascara spool to use as coloured mascara -I pretty much just use them as colour bases for my eyeshadows-.


What I didn’t like about them:

There are only two things I don’t like about the NYX Jumbo Eyeshadow Pencils.
  • Firstly the size of the pencil is literally “jumbo”, so you need a large whole sharpener. I feel these would be so much better if they just twisted up like the MAC Shadesticks. However this isn’t really a huge problem because you can easily find a large whole sharpener.
  • The second problem I have with these is that they crease a lot! You have to make sure to apply a very light layer of them because a thick layer will crease almost instantly. 
    • I HIGHLY recommend wearing an eyeshadow base under these so creasing won’t be an issue.


My favourite NYX Jumbo Eyeshadow Pencil is the one in the shade “milk”. It’s just a flat white colour that I blend onto my eyelids to help make my actual eyeshadows stand out more. 
*When I apply these shadow pencils I find the easiest way is to rub a little onto our finger and then apply it to your eyelids. This way you’re not tugging the pencil on your eyelid.

SWATCHES:


I forgot to swatch this one with the others :P


How I store my NYX Jumbo Eyeshadow Pencil:


Overall I think the NYX Jumbo Eyeshadow Pencils are wonderful. For the price the quality is amazing and I really recommend them.

Stay Fabulous!
xoxo
naheeda ♥

3.20.2012

Nails Of The Day: Essie "Turquoise and Caicos" ♥


Essie’s “Turquoise and Caicos”
Today I’m wearing Essie’s “Turquoise and Caicos” on my nails. This is a beautiful mint green/turquoise colour that is pretty much the same colour of the ever so famous Tiffany & Co. blue jewelry boxes. I bought this nailpolish at Shoppers Drugmart for about $12.

I just love this nailpolish so much because it’s the perfect colour for warmer days at the beach. It adds that eye catching pop of colour to an outfit and looks amazing on all skin tones. I also find the name of the nailpolish itself really cute because it’s a play on words of the Turks and Caicos Islands where the crystal clear water is pretty much the same shade as this polish.

The formula of this nailpolish however, is terrible. It’s really thin and very streaky and the polish is very runny. I applied 4 coats of this nailpolish to get an opaque even layer of colour true to the bottle. The drying time of this polish is also excruciating. I’ve bought nailpolishes for $1 that apply and dry more easily that this polish. It literally takes forever for Essie’s “Turquoise and Caicos”  to dry, but because I love this colour so much I went and bought the Nicole by OPI Nail Treatment Drying Drops ($10) to make this polish easier to work with.

Overall, although the formula of this nailpolish is a disaster I always myself going back to this stunning colour for bright spring days and I probably will repurchase it for my collection.


a girl is only defenseless until her nail polish is dry
stay fabulous!
xoxo
naheeda ♥


3.16.2012

How to Get Fuller Looking Lips ♥

Hey Everyone!


I always wondered why people change their face and get painful and costly surgeries just for bigger lips? Work with what you have. Makeup is an amazing way you can camouflage or enhance what you want, so here’s a simple way you can manipulate the look of full plump looking lips without any sort surgeries or “lip plumping” glosses.

plain lips
Step One:
Start off with your plain lips. The first step you want to do is exfoliate your lips once or twice a week. Exfoliating is a key step when taking care of your lips. Like exfoliating the face, exfoliating your lips will take off any excess dry or dead skin . Something to keep in mind is that your lips are delicate so never over exfoliating. Exfoliating can also temporary actually make your lips larger and redder, making them look plump.

lips with exfoliating scrub on them
I use the Sensational Kiss Lips So Soft Exfoliating Balm by Lise Watier. I just apply a little to my plain lips and gently rub it in. Something I don’t like about this exfoliator is that you’re supposed to leave it on so I usually just take a towel with a little warm water and wipe it off so I can remove the exfoliated parts off. This lip exfoliator is about $30 CAD so a cheaper alternative is to just make your own. You can use a combination of equal parts sugar and honey or Vaseline and it will work just fine!

*Do not exfoliate when your lips are chapped! Exfoliating done right will leave your lips instantly smooth to the touch.
*Always moisturise your lips after exfoliating.

lips with lip balm
Step Two:
The second thing I do is apply a lip balm. I'm currently using a Burts Bees lip balm (about $5 CAD). I like this lip balm because I'm a sucker for labels and it says it’s made with all natural ingredients including beeswax, coconut and sunflower oils as well as vitamins and essential fatty acids to nourish, condition and soften lips. Using lip balm regularly is a great way to maintain healthier and stronger lips. Applying a lip balm will also give you a smooth surface for when you apply lipsticks or lipglosses.

*Let your lip balm set into your lips for about five minutes before the next step

lips with a layer of foundation
(Fit Me Foundation in "230"
by Maybelline -about $8 CAD-)
Step Three:
The next thing I do is take a foundation or concealer and dab on a very light layer over my lips. This will erase your natural lip colour and make them a blank surface. I always just use any foundation that I'm using for my face.

Step Four (optional):
This step is optional but next you can take a lip liner and line your lips. Some people like to go SLIGHTLY above their natural lip line to get even larger looking lips. Lining your lips will also make your lipstick or lipgloss last longer.
lips with lip liner (Exaggerate Lip Liner in "Natural"
by Rimmel London -about $9 CAD-)

*For longer wear of your lipstick or lip gloss you can also take your lip liner and fill in the inner corners of your lips because lip products usually tend fade in the outer corners the most (for a more natural affect, you can blend the lip liner towards the center of your lips).


Step Five:
For the next step you will need two lip sticks that coordinate with your lip liner (one should be slightly darker than the other). Apply the lighter lipstick to the center of your lips and the slightly darker one in the corners of your lip. Blend the parts where the two colours meet. It should be a VERY unobvious gradient affect.
lips with lipsticks

The combination I’m using is “Toasted Almond 843” (darker colour) and the ever so famous “Fairest Nude 800” (lighter colour) by L'Oréal. These L'Oréal lipsticks retail for about $11 CAD each.

Step Six:
Next take a clear lipgloss or a barely tinted lipgloss in the same colour range as the lipsticks you used and apply it to the center of the bottom lip. This will really give you that sexy pout bigger lips tend to have.

I'm using MAC’s dazzleglass in “Pleasure Principle” ($23 CAD).

lips with lipgloss and highlight
Step Seven:
The last and final step is to take a highlighter and apply it to the cupids bow. You can use any kind of highlighter that works best for your skin tone or even a shimmer neutral (white/beige/tan/brown) eyeshadow. This will really balance out your pout and give some definition to the upper lip as well. A highlight may seem obvious at first but honesty you’re the only one who will notice it because you applied it. Other people will just notice the definition of your cupids bow.

*DO NOT overdue the highlight. It will defeat the purpose of a subtle shine and just make you look awkward.

I’m using a NARS illuminator in the shade “Orgasm”. It retails for about $36 CAD, which is a bit pricey but it really is a great product that you can use on different parts of your face as a highlight.


This technique works with all colours ranges but I find that overall nude lips do make your lips look the biggest.

Enjoy your new larger than life lips and stay fabulous!
xoxo
naheeda ♥

3.08.2012

Review and Swatches: Glam’Eyes HD Eyeshadows by Rimmel London ♥

Hey Everyone!

This is a review on the Glam’Eyes HD Eyeshadows by Rimmel London. I haven’t heard a lot about these eye shadows and I really don’t understand why. These are a great product from Rimmel and I really recommend them. I think they are available in about eight different colour palettes and I could only find then in Wal-Mart. They cost about $8 per quad and are worth every penny. These palettes come with four different coordinating colours which can be used as a highlighter, lid colour, crease colour and outer corner colour.

The packaging of these quads is basically similar to most drugstore eyeshadows. They come in a plastic container with a clear snap on lid. These palettes are compact and very travel friendly. The names of the quads are on the back of every palette as well as a little chart that shows you where you can place each colour (which is great for beginners to makeup). The only thing I didn’t like about these palettes is the size of some of the colours. The arrangements of the eyeshadows are made to look like a British Flag which is interesting, but it makes the individual colours really small. I find that I have a hard time fitting a brush into a specific colour without getting the brush into another colour. This is not an eyeshadow palette you can apply with your fingers but each quad does come with a double ended sponge tip applicator.

I have five different Glam’Eyes HD palettes in “007 Heart of Gold”, “002 English Oak”, “006 Purple Reigne”, “001 Black Cab” and “008 True Union Jack”.


SWATCHES:


Overall I think these palettes are amazing. The colours are all extremely pigmented and smooth. They have a very similar texture to the Armani Eyes to Kill Shadows and L'Oréal Infallible Eyeshadows (click for review and swatches) but are cheaper than both. The colours swatch great and they are equally as vibrant when they are applied to your eyes. This is an incredible product and it truly proves that drugstore makeup can be just as good as high-end makeup.

stay fabulous!!
xoxo
naheeda 


3.06.2012

Review and Swatches: Dream Bouncy Blush by Maybelline ♥

Hey Everyone:

Today I’m reviewing the Dream Bouncy Blushes by Maybelline. You can find these at most department and drug stores. They retail for about $6 to $10 (CAD) and are available in ten different shades.

When I first saw these at Wal-Mart I was really amazed at the whole “bouncy” idea. At the Wal-Mart I went to, they didn’t have any testers out so I decided to just get a few to try out and decide if I like them or not. I ended up picking up only four in the colours “50 Plum Wine”, “20 Peach Satin”, “10 Pink Frosting” and “45 Orchid Hush”.


Packaging:
  • Plastic
  • They have clear lids that snaps on
  • Colour names are written on the back
  • Nothing special

What I liked:
  • Not oily
  • If you are trying to achieve a natural look this is a good product
  • Not a typical cream blush. Texture is very new and unique (exactly like play-doh).

What I didn't like:
  • Very hard to get colour because the texture makes it hard to work with
  • They all swatch well, but are very sheer when you blend them in
  • The darker colours have the most pigmentation otherwise you REALLY have to pack it on
  • The colours aren’t very nice and they all pretty much look the same on your face
  • The bouncy part is kind of cool but I was disappointed. They don’t actually “bounce” they just squish in.
  • They aren’t worth the price (you can get so many other better blushes at the drugstore for around $10)
  • They don’t last very long at all (maximum four hours)
  • These blushes do not work well with brushes. When you use a brush you get extremely little colour payoff. (You have to use your fingers)

SWATCHES:
Dream Bouncy Blushes- not blended

Dream Bouncy Blushes- fully blended

Overall I don’t really like the Dream Bouncy Blushes at all. I think they are a gimmick. If you like trying new textures you may enjoy these blushes but honestly they aren’t very good. They are however really soft and if these blushes were more pigmented and lasted longer they would have been a very good product. I do not recommend these blushes.

stay fabulous!! 
xoxo
naheeda ♥

3.01.2012

Review and Swatches: Girl Meets Pearl by Benefit ♥


Hey Everyone!


Recently I decided before I buy any new makeup products I’m going to use up things I already have in my collection. So for about a month now I have been using a product called Girl Meets Pearl by the brand Benefit as an everyday highlight. It’s a rosy pearl highlighter with a golden glow. You can find it at Sephora or at http://www.benefitcosmetics.com/product/view/girl-meets-pearl for $30.


I’m somewhat on the fence about this product.


What I Liked:
  • Smells delicious
  • Looks amazing when you first apply it
  • Gives you a great dewy summer look
  • Amazing at accenting a tan
  • Makes you look refreshed
  • Great product to mix in with your foundation and apply all over your face
  • Great for everyday use
  • The packaging is SUPER cute
    • The box it comes in has a really pretty night scene on it (reminds me of Paris for some reason)
    • When you open it, it comes with two caps
    • You twist up the bottom for the product to come out


What I didn’t like:
  • It’s very sheer when you blend it in
  • You have to be under direct light for you to be able to see it
  • A great product but not worth $30+tax CAD
  • It doesn't last very long (maybe 3 hours)
  • If you apply too much it looks like you applied shimmer powder on your face
  • Looks better on camera than in real life


Overall I do think this a great product to have to achieve a natural glow but it’s not the ideal product to have if you want that extra bit of dewiness to your completion.

SWATCHES:
Girl Meets Pearl- freshly applied

Girl Meets Pearl- 1/2 blended 
Girl Meets Pearl- 3/4 blended

Girl Meets Pearl- fully blended
stay fabulous girls!!
xoxo
naheeda ♥

2.27.2012

Forever 21 Accessories Haul ♥

Hey Everyone!

Firstly I’m soo sorry this haul’s late, I’ve been super busy lately.

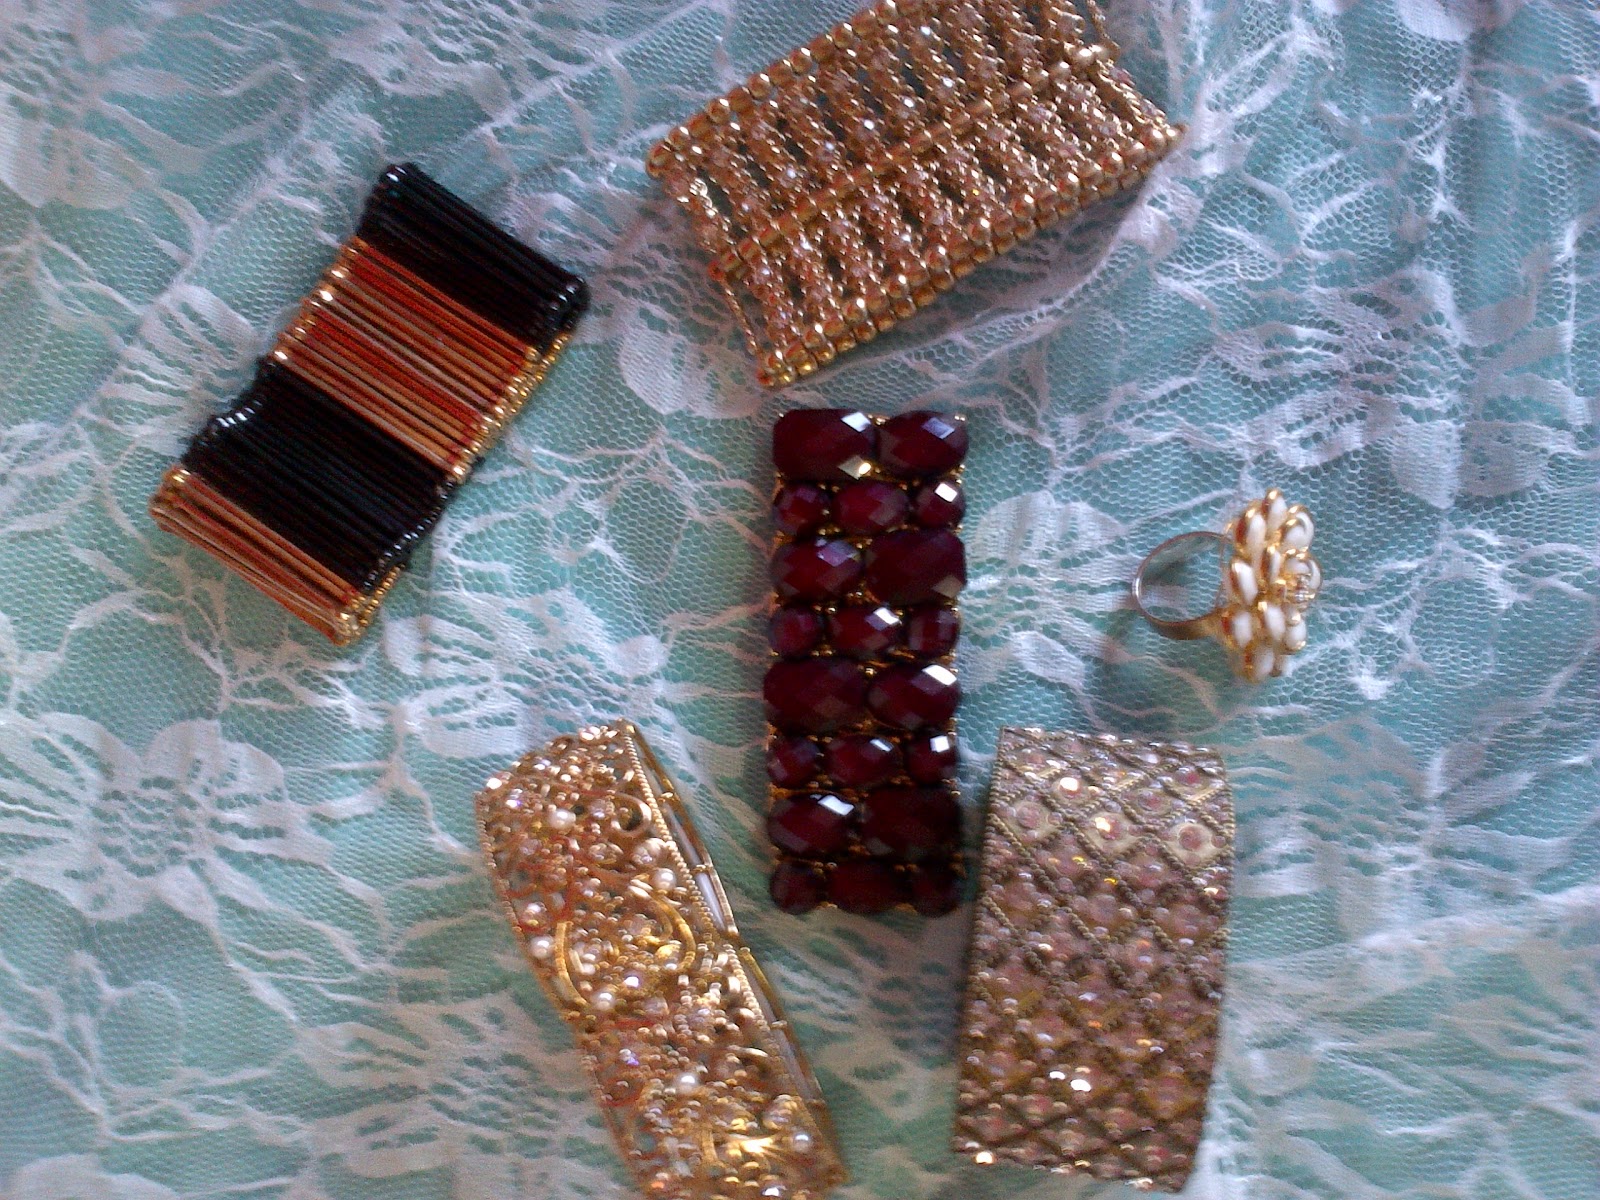
About two weeks ago I went to Forever 21 and I couldn’t really find any nice clothes so I decided to go to the accessories section and I did end up picking up a few things. I picked up five bracelets and two rings. But the sucky part is I lost a ring :( so I have five bracelets and one ring to show you guys today.


The first thing I got is an antique looking bracelet. It’s made up of diamond shaped panels with a rhinestone in the middle of each diamond. At first when I got this bracelet I thought it was really pretty but I don’t think I like it anymore as much as I did in the store. It’s pretty much a statement bracelet so I decided to wear it with this plain army green button up shirt collared shirt:


I also got two gold and rhinestone bracelets. One of them is a floral stretchy bracelet and I think it’s really cute (bracelet on the left). I like this bracelet because the width of it is pretty big so it gives a cuff like affect when you wear it. The second gold bracelet I got also has a floral design on it but it’s much thinner than the other one (bracelet on the right). This bracelet also has rhinestones on it but what I like about this one is that it has little pearls on it as well. The reason I bought two gold bracelets is because I wear a lot of creams and I know I’m going to get a lot of wear out of both of these.

The fourth bracelet I bought is a cute jeweled stretch bracelet. The stones on it are a gorgeous dark reddish brown colour and the metal part is gold. I think is bracelet looks somewhat gothic yet glamorous. This bracelet is perfect to amp up simple shirts.  I really like the way it dresses up a normal looking shirt so I paired it with a casual loose top I got from Bluenotes:


The last bracelet I got is also a stretchy bracelet. It’s black and gold and made up of long metal pieces that look a little like bobby pins. It’s really versatile because I can wear it during the day but it also goes well with night time outfits. I think it looks great with this cheetah print shirt I have:


The last item for this haul is a white and gold flower ring I bought. This ring is a big ring that really draws a lot of attention to your hands. I have worn it on two different days and on both days I got a lot of compliments on it. I have never been a huge ring person because to me they get in the way a lot but lately I have been trying to get used to them because they are a great way to accessorize.


If you’re wondering what I have on my nails ^. I'm wearing one coat of Essie “Eternal Optimist” with two coats of one of the new Essie luxeffects in “A Cut Above”.


stay fabulous!!
 xoxo
naheeda♥ 

2.26.2012

Review and Swatches: Colour Tattoo 24HR Cream Gel Shadows by Maybelline♥

Hey Everyone!

The Maybelline Colour Tattoo 24HR Cream Gel Shadows are 24 hour cream eyeshadows. I love them so much and I feel like they are the perfect product to use as a base or as an eyeshadow itself. They come in 10 different shades and are available at Wal-Mart, Zellers and most Drugstores for around $10-$13.


The Maybelline Colour Tattoos come in glass pots with black lids that twist off. The quality of the packaging is really good and is very similar to the packaging of the MAC Paint Pots. Unlike a lot of drugstore products the packaging does not feel cheap or flimsy. Although it’s not a big deal, the only flaw I found with the packaging is that the names of the colours are written on the tops of the lid, I personally would have preferred the names to be on the other side so I can see the actual colour and the name at the same time. Something to keep in mind is that like all cream shadows you do have to MAKE SURE to close the lids tightly because they do dry up the more exposure to air they get.

The Maybelline Colour Tattoos aren’t like average drugstore cream shadows. The qualities of the Colour Tattoos are very similar to higher end makeup cream shadows. They definitely last all day without creasing or fading. I don’t know if they last 24 hours like they claim but I did wear them for a long 13 hours and they lasted amazingly. They are pretty much identical to the MAC Paint Pots. Don’t get me wrong I REALLY love the MAC Paint Pots but I think I like the Colour Tattoos a little better only because they are much cheaper (MAC Paint Pots are $21CAD) and also the quality is fairly the same as the MAC Paint Pots. The Maybelline Colour Tattoos also come in a wide range of colours compared to the MAC Paint Pots. Most of the Paint Pots are only offered in neutral tones whereas the Colour Tattoos come in all sorts of colours ensuring everyone can find a complementary shade.

The Colour Tattoos don’t crease or fade and are very buildable. They are also extremely pigmented and with one swipe are exceptionally vibrant. They come in shimmer and matte finishes and are also easy to use with eyeshadows that aren’t creams. After you apply them to your eyes they just don’t move and unlike other cream shadows once you put on these shadows you still have a good amount of time to blend them in.

In the directions it says not to let them completely dry before applying another layer but I feel the more layers I build the more tend to start chunking up. However when I do let each layer dry I can apply more product smoothly and easily.

My favourite Colour Tattoo is the “25 Bad to the Bronze.” It’s a beautiful bronze colour that perfect for all over your lid. It makes your eyes look gorgeous but at the same time it’s not dramatic at all. I apply it with my finger and just blend it out, sometimes I apply it with my fingers and then I’ll take a brush and blend out the edges. Either way the application is effortless and looks amazing on your eyes like all the other Maybelline Colour Tattoos.

I have eight out of ten shades and here are their SWATCHES:

swatches without flash

swatches with flash


I really hope you try out these amazing Maybelline Colour Tattoos.

stay FABULOUS!
xoxo
naheeda ♥

2.24.2012

Makeup Bag 101 and What's in My Makeup Bag ♥

Hey everyone!

Have you ever gone a day where you’re running around and your makeup starts to wear off!? Theres one solution for that, carry a makeup bag. 

This is what I carry in my makeup bag and hopefully I can help you decide what you may or may not need in yours. Basically I carry everything I need to do my makeup on the go. I usually NEVER need everything I carry but it’s always better to be safe than sorry.


Basic Rules:
  1. When putting together a makeup bag the first rule is to be practical. You don’t want to be that one person that carries the giant tub of Vaseline. This is a makeup bag not your bathroom cabinet.
  2. Make sure everything you need is something you’re actually going to use. I barely wear bold coloured lips so I don’t carry any bold lip products in my makeup bag. Its oneless thing you need to carry around and you can save the space for the future when you may need to add something. 
  3. Thirdly carry around applicators. There’s no point of bringing makeup around with you if you have nothing to apply it with. I actually have a second makeup bag with my Shu Uemura Eyelash curler, my Juicy Couture Viva La Juicy rollerball and the following application tools: 
    • Sponges
    • Q-tips,
    • MAC 214 short shader brush
    • MAC 182 kabuki buffer brush
  4. Fourthly you OBVIOUSLY have to make sure you have a mirror. To save space I just use the mirror in one of my compacts. 
  5. The last and most important rule to having a makeup bag is to make sure that everything is clean! Carry around hand sanitizer or sanitizing sheets to clean your hands or makeup tools on the go. It’s critical to NEVER put anything dirty on your face.
My Makeup Bags:
My makeup bag is just a cute little sequins pouch. I got this bag because it has a zip and I can just throw it in my bag and I don’t have to worry about it opening and everything falling out. I got it from a store in the mall, I don’t remember which one but I do remember it was SUPER cheap and the hot pink sequins just totally caught my attention. My second makeup bag is another zipper pouch. I got it as a present for my birthday with a Bath and Body Works cream set.

Things I Carry In My Makeup Bag:

Face:
The first thing I carry is a staple in my makeup bag. It is my favourite foundation, which is the Laura Mercier Silk Crème foundation in the shade “Hazelnut Beige.” I did a review on this product so you can check it out if you want more details about this foundation (CLICK for review).

Another face product I carry in my makeup bag is my Urban Decay De-Slick Mattifying Powder. This is an amazing product that helps reduce and control the shininess on your face. It’s transparent and scentless and leaves your face completely matte.

For my cheeks I carry a NARS blush in the shade “Desire.” I first got this blush because I heard a lot of good things about the colour payoff. When I saw it at Sephora I realized it was the prettiest hot pink blush ever and of course I HAD to have it. “Desire” is really pretty when applied with any blush or fluffy brush. It can be very subtle and natural when applied with a light hand but it’s also extremely buildable and can give you a vibrant pop of pink in a matter of strokes.

Lastly for my face I carry my L'Oréal Paris True Match Super-Blendable warm Concealer in the shade “light/medium W4-5” which is a great drugstore concealer for under your eyes. It blends well and last long. Im not 100% in love with it but it is a great product that I use pretty often.

Eyes:
The first thing I carry in my makeup bag for my eyes is my Stilla Smudge Stick in the shade “Stingray.” This eyeliner is the perfect on the go eye liner. It’s a twist-up so you don’t need to sharpen it and it glides on perfectly and smoothly. It’s very long lasting and super vibrant. You can save space with this product because you can use it on your waterline, lash line and to line your lids so you don't have to carry around other eyeliners.

I also carry my favourite mascara which is Maybelline Volum' Express The Falsies mascara (aka Maybelline Falsies). I have it in the shade “Black Drama” and this has been my go to mascara for more than a year now. I LOVE this mascara so much because it lasts the whole day and looks amazing. It curls and lengthened my lashes and thickens them to whole new degree. I’m constantly trying new mascaras just to see if I can find one as good as the Falsies mascara and I have yet to find one! Another reason I love this mascara is because of the price! You can find this mascara at WalMart for only $5-$10. For the quality of this product the low price is just a cherry on top.

The next thing I carry in my makeup bag is my Lancome Color Design Palette in “Taupe Craze.” This is a neutral eyeshadow palette which is small and sleek enough to fit right into anyone’s makeup bag. It comes with 2 sponge tip applicators and contains 5 different products which are all different colours. It consists of an all over eye shadow base, a lid colour, a crease colour, a highlight colour and a liner colour. I like to carry this palette in my makeup bag because it has different taupe toned colours that can be worn in different ways to achieve a night or day look. Something else I like about this palette is that there are a variety of textures. Sometimes I take the highlight colour and apply it along my cheekbone, on my cupids bow and on the bridge of my nose to highlight my face. Overall it’s a really great that's also very versatile. 

Lips:
On average I usually just have a light or pale lip colour on. In my makeup bag I have four products that I use on a day to day basis which are the  NARS lipgloss in “Turkish Delight”, two Colorburst Lip Butters by REVLON in the shades “Crème Brulee” and “Brown Sugar” (CLICK for review) and lastly one of my favourites, the Estée Lauder Pure Color Crystal Lipsticks in the shade “Ripe Papaya.”


Always remember everyone uses different products and your makeup bag should be customized to what you need. :)

I hope this helps you put together a makeup bag and NEVER forget to stay fabulous!
xoxo
naheeda♥


2.17.2012

Review and Swatches: Urban Decay NAKED Palette vs. NAKED2 Palette ♥

Hey everyone!

Urban Decay NAKED Palette

Urban Decay NAKED2 Palette

When the NAKED palette by Urban Decay came out as many of you know it was literally like finding a four leaf clover to see one actually in stock at a Sephora. The NAKED palette is by far the best neutral palette probably ever created because of its versatility and after much success with it Urban Decay decided to also come out with a second NAKED palette called the “NAKED2” palette.
Deciding whether to get the NAKED2 palette was literally a "to be or not to be" moment for me, but obviously because I have no self-control I ended up getting it…
The original NAKED palette and the new NAKED2 palette can be found at Sephora stores ($55 CAD +tax) or at http://www.sephora.com ($50). I LOVE LOVE LOVE the NAKED palettes! All the colours are super pigmented and they have great practical shades for everyday use.

Packaging:
Between the NAKED1 palette and the NAKED2 palette the packaging is significantly different. In my opinion I prefer the packaging of the original NAKED palette better. Firstly the NAKED1 palette has a sleeker and compact case that is covered with a velvet material, whereas the NAKED2 palette is made out of a metal case which looks a little like a pencil case. Secondly I feel like the NAKED2 is bulkier and isn’t as flexible. Both lids are supposed to fold back completely but I sometimes feel like if I fold the lid of the NAKED2 palette back too much it’s going to snap off. Also the NAKED2 palette has a new snap in lid but you have to make sure that you align the top with the bottom so you can close it, which can get a bit annoying. The original NAKED palette has a magnetic closure so you just have to flip the top down and it closes. The only flaw with the packaging of the original is that it does get dirty easily because of the velvet coating. Unlike the NAKED1 palette which has a small mirror on the inside, the NAKED2 palette has a big mirror that can be very useful when you are outside. Although I like the overall look of the original NAKED palettes packaging the second NAKED palette is definitely hardier and more secure.

The Colours:
Inside NAKED1 Palette
The original NAKED palette consists of 12 colours:
  1. Virgin
  2. Sin
  3. Naked
  4. Sidecar
  5. Buck
  6. Half Baked
  7. Smog
  8. Darkhorse
  9. Toasted
  10. Hustle
  11. Creep
  12. Gunmetal

Inside NAKED2 Palette
The second NAKED palette also consists of 12 colours:
  1. Foxy
  2. Half Baked
  3. Bootycall
  4. Chopper
  5. Tease
  6. Snakebite
  7. Suspect
  8. Pistol
  9. Verve
  10. Ydk
  11. Busted
  12. Black Out

There are some similarities between the colours between the NAKED palettes:
  • “Half Baked” is in both palettes
  • "Busted" is similar to "Hustle"
  • "Snakebite" is similar to "Darkhorse"
  • "Booty call" is similar to "Virgin"


My favourite colour is “Half Baked” which is available in both palettes and “Blackout” which is a gorgeous opaque dark and matte black colour. You can attain great day time and night time looks like brown and black smokey eyes with both palettes. The colours in each palette are different and I think buying the second NAKED palette would be a great investment in another set of 12 great neutral everyday eyeshadows. Both NAKED palettes consist of a bunch of popular Urban Decay eyeshadows so it’s SOO worth the $50. The NAKED1 palette has more shimmer colours than the NAKED2 palette and I feel like the NAKED2 palette has a more even combination of cool and warm colours.

What It Comes With:
"Naked" Lip Junkie Swatch
The NAKED1 palette comes with an Urban Decay “original” primer potion and a Good Karma Shadow Brush. I think both the primer potion and the brush are great add-ons for this palette because you have everything you need to achieve a great and lasting eye look with this set. The NAKED2 palette comes with an Urban Decay Lip Junkie which is a cooling and plumping lip gloss in “Naked” and a Good Karma Shadow/Crease Brush. Although the “Naked” Lip Junkie looks pink-ish/red in the tube it’s pretty much clear when you apply it. It is also sticky, which is hate! I would have preferred to just get another primer potion like the original NAKED palette because there is nothing really special about the Lip Junkie. The brush the NAKED2 palette comes with however is a really good and convenient brush.

Now for the fifty dollar question “do you need both NAKED palettes”!? Personally I don’t think you do. I honestly think the biggest difference between the palettes (besides the colours) is the packaging, so I don’t think it’s worth it to spend another $50 on a second NAKED palette when there are so many other things you can buy with $50. If you're into makeup you will notice that all the colours amongst each palette ARE different (except for “Half Baked”) and you may find use in buying both palettes. However the overall looks achieved will be very similar and I don’t think it’s a necessity to have both. On that note, I do think every girl should have at least one of the palettes because they are honestly just AMAZING.

SWATCHES:

NAKED1 Palette Swatches

NAKED2 Palette Swatches

stay fabulous!
xoxo
naheeda♥